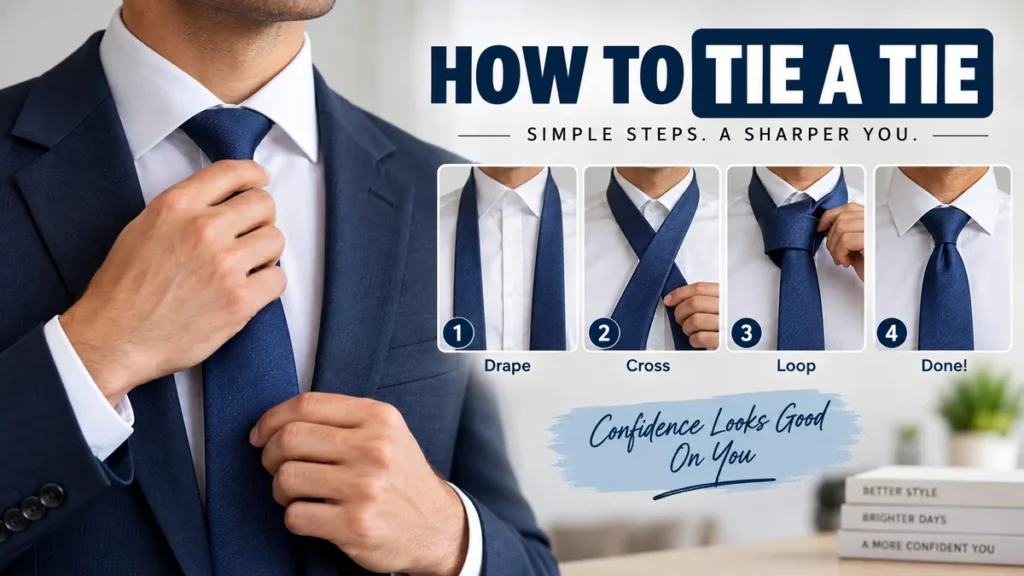
Tying a necktie can feel surprisingly complicated when you are staring into a mirror with two uneven ends and no idea which one goes where. The good news is that you do not need to memorize dozens of tie knots. One simple knot can handle most everyday situations.
To learn how to tie a tie quickly, start with the Four-in-Hand knot. Place the wide end on your right, cross it over the narrow end, wrap it behind and across the front, bring it through the neck loop, then feed it through the front loop. Tighten and slide the knot toward your collar.
Once you understand that basic movement, learning other necktie knots such as the Half-Windsor, Full Windsor, and Pratt becomes much easier.
This guide explains each step, how long your tie should be, which knot works with different shirt collars, how to create a tie dimple, and how to fix the mistakes that commonly frustrate beginners.
How to Tie a Tie for Beginners: Start With the Four-in-Hand
If you are learning how to tie a tie for the first time, the Four-in-Hand is the best place to begin.
It creates a slim, tapered knot with a slightly asymmetrical shape. It requires relatively few movements, is easy to loosen, and works with many common neckties and shirt collars. Ties.com rates it as its easiest knot and recommends it as the single knot to learn if you only want to master one.
The Four-in-Hand is particularly useful for:
- Everyday office wear
- Job interviews
- School uniforms
- Weddings and other events
- Narrow or standard collars
- Button-down collars
- Slim and standard-width neckties
- Beginners learning their first tie knot
Do not worry if the finished knot is not perfectly symmetrical. The slight asymmetry is a normal characteristic of the Four-in-Hand rather than evidence that you tied it incorrectly.
Before You Start
Button your dress shirt and raise the collar.
Drape the necktie around your neck with its front side facing outward. For the standard right-handed method, position the wide end on your right and the narrow end on your left.
The wide end needs to hang considerably lower because it travels around the narrow end several times before forming the finished knot.
A commonly recommended starting point is roughly 12 inches (30 cm) of difference between the two ends, although the exact position varies with your height, torso length, tie length, tie thickness, and knot choice.
If your finished tie ends up too short or too long, you have probably not made a tying mistake. You simply need to change the starting position and try again.
How to Tie a Tie Step by Step With the Four-in-Hand Knot
Stand in front of a mirror for your first few attempts. Remember that mirror directions can initially feel reversed, so concentrate on the movements of the wide end rather than trying to memorize left and right.
Step 1: Position the Tie
Place the tie around your neck.
Keep the narrow end on your left and the wide end on your right. Let the wide end hang much lower than the narrow end.
The exact starting length takes some experimentation. Your goal is for the wide blade to reach approximately your waistband when the knot is finished.
Step 2: Cross the Wide End Over
Take the wide end and cross it over the front of the narrow end, moving toward your left.
Hold the crossing point gently between your fingers.
This becomes the foundation of the knot.
Step 3: Bring the Wide End Behind
Move the wide end behind the narrow end and bring it back toward your right.
The backside or seam of the wide blade will temporarily face outward.
Keep the narrow end reasonably still.
Step 4: Cross the Front Again
Bring the wide end horizontally across the front of the narrow end, moving from right to left.
You have now created the horizontal band that will form the visible front of your knot.
Do not pull everything completely tight yet. You need enough room to complete the next steps.
Step 5: Bring the Wide End Through the Neck Loop
Take the wide end upward from underneath and feed it through the opening between your neck and the tie.
Pull it completely through.
You should now see the basic structure of the knot forming below your collar.
Step 6: Feed It Through the Front Loop
Remember the horizontal band you created across the front?
Keep that opening slightly loose with a finger.
Guide the wide end downward through this front loop until the entire wide blade has passed through.
These movements match the standard Four-in-Hand sequence shown by multiple tie guides.
Step 7: Tighten and Adjust
Hold the narrow end with one hand.
With the other, gently slide the knot upward toward your collar while pulling the wide end downward as needed.
Avoid yanking the knot. Gradual tightening produces a cleaner shape and puts less unnecessary stress on the fabric.
Lower your shirt collar and center the tie.
You have tied a Four-in-Hand.
Quick Takeaway: Over → behind → across the front → up through the neck loop → down through the front loop → tighten.
That short sequence is much easier to remember than seven individual instructions.
How Long Should a Tie Be?
Knowing the knot is only half the job. A perfectly shaped knot can still look awkward when the tie finishes several inches too high or hangs far below your waist.
As a practical rule, the tip of the wide end should finish around the waistband or belt area. KissTies similarly instructs that the wide end should finish in front of the belt after the knot is adjusted.
There is no universal starting position that guarantees this result for everyone.
Your finished length depends on:
- Your height
- Torso length
- Neck circumference
- Tie length
- Tie width
- Fabric thickness
- Knot size
- Trouser rise
A Full Windsor consumes more fabric than a Four-in-Hand, for example, so the same starting position can produce noticeably different finished lengths.
What If the Tie Is Too Short?
Untie it and begin again with more of the wide end hanging down at the start.
This is particularly common when learning the Full Windsor because its additional wraps consume more fabric.
Very tall people may also find that some standard-length ties provide limited room for larger knots.
What If the Tie Is Too Long?
Start again with less length on the wide end.
Do not try to solve an excessively long tie by making the knot unnecessarily loose or leaving it hanging well below the waistband.
Should the Narrow End Be Visible?
Normally, the narrow blade sits behind the wide blade.
Many ties have a keeper loop on the reverse of the wide blade. You can pass the narrow end through it to keep the tie tidy.
If the narrow blade extends significantly below the wide one, your starting lengths need adjustment.
How to Make a Dimple in Your Tie
A tie dimple is the small indentation immediately below the knot.
It gives the front blade some dimension instead of allowing it to hang completely flat.
The easiest time to create one is during the final tightening.
Before pulling the knot fully toward your collar:
- Place your thumb and middle finger on the sides of the wide blade immediately below the knot.
- Use your index finger to press gently into its center.
- Pinch the sides inward.
- Maintain that shape while tightening the knot.
- Make small adjustments after the knot reaches the collar.
The result should be a natural-looking central fold.
Do not obsess over making both sides mathematically identical. With softer fabrics, the dimple may naturally be less defined than it is with a more structured tie.
Which Tie Knot Should You Choose?
Once you can reliably tie the Four-in-Hand, three other names are worth recognizing: Half-Windsor, Full Windsor, and Pratt.
Current tie guides consistently distinguish them mainly by size, symmetry, difficulty, and compatibility with different collar spreads.
| Tie Knot | Shape | Relative Size | Difficulty | Works Well With |
|---|---|---|---|---|
| Four-in-Hand | Slightly asymmetrical | Small/slim | Easy | Narrow, point and button-down collars |
| Half-Windsor | Balanced, triangular | Medium | Moderate | Point and semi-spread collars |
| Full Windsor | Symmetrical triangle | Large | Moderate | Spread and wide-spread collars |
| Pratt | Neat, relatively symmetrical | Medium | Moderate | Many standard business collars |
There is no single knot that is objectively correct for every shirt and tie.
Think about proportion.
A very small knot can look lost beneath an extremely wide-spread collar. A large Full Windsor can overwhelm a narrow collar or become bulky when made from a thick tie.
The Simplest Choice
If you are standing in front of the mirror and simply need your tie tied, use the Four-in-Hand.
If you want something more symmetrical without a particularly large knot, learn the Half-Windsor next.
How to Tie a Half-Windsor Knot
The Half-Windsor is one of the most useful knots to learn after the Four-in-Hand.
It creates a more balanced and symmetrical triangle while remaining less bulky than the Full Windsor. It is widely used for business clothing, interviews, weddings, and other situations where a clean traditional knot suits the outfit.
Half-Windsor Step-by-Step
- Place the wide end on your right and the narrow end on your left, with the wide end hanging lower.
- Cross the wide end over the narrow end toward your left.
- Bring the wide end underneath the narrow end toward your right.
- Take the wide end upward toward the neck loop.
- Feed it through the neck loop and bring it down toward the opposite side.
- Bring the wide end horizontally across the front of the knot.
- Feed the wide end upward through the neck loop from underneath.
- Pass it downward through the horizontal front loop you just created.
- Hold the narrow end and carefully slide the knot toward your collar.
- Shape the triangle and create a dimple if desired.
Published instructions vary slightly in how individual movements are divided into numbered steps, but the underlying Half-Windsor construction is the same.
When Should You Wear a Half-Windsor?
The Half-Windsor is a useful middle ground.
Choose it when the Four-in-Hand seems too narrow but the Full Windsor would look too large.
It pairs especially naturally with a semi-spread collar because the medium-sized triangular knot fills the collar opening without dominating it.
It is also forgiving enough to become an everyday business knot once you have practiced it.
How to Tie a Tie With a Full Windsor Knot
The Full Windsor, often simply called the Windsor, creates a broad, symmetrical triangular knot.
Compared with the Four-in-Hand and Half-Windsor, it uses more tie length and produces more bulk. That makes it particularly compatible with spread and wide-spread collars.
Full Windsor Step-by-Step
- Drape the tie around your neck with the wide end on your right.
- Allow considerably more length on the wide end.
- Cross the wide end over the narrow end.
- Bring the wide end upward through the neck loop.
- Bring it down to one side.
- Take the wide end behind the narrow end toward the opposite side.
- Bring it through the neck loop again to form the other side of the triangular base.
- Cross the wide end horizontally across the front.
- Bring it upward through the neck loop from underneath.
- Feed it down through the front horizontal loop.
- Pull gently to tighten.
- Hold the narrow end and slide the finished knot upward toward your collar.
- Shape both sides until the knot looks balanced.
This additional wrapping is what gives the Full Windsor its characteristic wider triangular structure.
Full Windsor vs. Half-Windsor
The names make the difference sound more complicated than it is.
The Half-Windsor is generally smaller and requires fewer movements. The Full Windsor creates a broader, fuller triangle and consumes more tie fabric.
Choose according to the proportions of the shirt, tie, and wearer rather than assuming that a larger knot automatically looks more formal.
A thick tie combined with a Full Windsor can become excessively bulky. In that situation, a Half-Windsor or Four-in-Hand may produce a cleaner result.
What Is the Pratt Knot?
The Pratt knot, another useful medium-sized necktie knot, offers an alternative when you want something between the narrow Four-in-Hand and larger Full Windsor.
It is one of the four core knots included in current menswear guides alongside the Four-in-Hand, Half-Windsor, and Full Windsor.
One difference beginners immediately notice is that the Pratt is commonly started with the tie positioned differently from the familiar Four-in-Hand setup.
That can initially make it less intuitive if the Four-in-Hand movements are already committed to memory.
You do not need the Pratt to wear a tie successfully. For most people, mastering the Four-in-Hand and Half-Windsor first provides more than enough flexibility.
Four-in-Hand vs. Windsor: What Is the Difference?
The biggest differences are size, symmetry, fabric usage, and collar compatibility.
The Four-in-Hand creates a narrow, mildly asymmetrical knot. The Windsor creates a broad, symmetrical triangle.
That changes the visual proportions around your collar.
Choose a Four-in-Hand When:
- You want the easiest method.
- Your shirt has a narrow or moderate collar opening.
- Your tie fabric is thick.
- You prefer a slimmer knot.
- You like a slightly relaxed, asymmetrical appearance.
Choose a Windsor When:
- Your shirt has a spread or wide-spread collar.
- You want a larger symmetrical triangle.
- Your tie is long enough to accommodate the additional wrapping.
- The fabric is not so thick that the knot becomes oversized.
The Half-Windsor sits comfortably between these two.
Quick Takeaway: Do not choose a tie knot based only on the occasion. Match the knot’s size to the collar opening and the thickness of the tie.
How Tight Should a Tie Be?
Your knot should sit neatly against the collar without feeling restrictive.
Slide the knot upward until it reaches the collar button, but stop once everything sits securely.
A necktie is an accessory, not a tourniquet.
If the collar is painfully tight before you even tighten the tie, the problem may be your shirt’s neck size rather than your knot.
The finished setup should allow you to stand, sit, speak, and move normally.
If you loosen your collar button during the day, remember that the knot may need readjustment before entering a more formal setting.
How to Tie a Tie Without Getting the Length Wrong
Length is one of the biggest beginner frustrations.
You follow every knotting step correctly, tighten everything, and discover that the wide blade stops halfway down your stomach.
There is a simple solution: change where the ends begin rather than changing the knot itself.
Suppose your completed Four-in-Hand finishes several inches too short. Untie it and position the wide end lower before repeating exactly the same knot.
If it finishes too long, start with the wide end higher.
After a few attempts, you will discover the starting position that works for your height and favorite tie.
A Useful Reference Point
Some guides use the belly button as an approximate reference for positioning the narrow end, while others recommend a fixed difference between the two ends. Ties.com specifically notes that the starting position varies according to the wearer’s height and the tie’s length and thickness.
Treat measurements as starting points, not absolute rules.
Your final result matters more.
Common Tie-Tying Mistakes and How to Fix Them
Most beginners do not struggle because the knot itself is extraordinarily difficult. Small setup errors usually cause the trouble.
The Tie Finishes Too Short
Cause: You did not leave enough material on the wide end before starting.
Fix: Untie it and begin with the wide end hanging lower.
This happens more frequently with larger knots because they consume additional fabric.
The Tie Finishes Too Long
Cause: Too much fabric started on the wide side.
Fix: Move the wide end higher before tying the knot again.
The Knot Is Loose
A properly constructed knot can still look messy if you stop before tightening it.
Hold the narrow end and carefully slide the knot upward until it sits against the collar.
Do not tighten only by pulling aggressively on the wide blade. Shape the knot with your fingers as you go.
The Four-in-Hand Looks Crooked
A little asymmetry is normal.
The Four-in-Hand is intentionally less symmetrical than the Half-Windsor and Windsor.
If you want a noticeably more balanced triangular appearance, use a Half-Windsor rather than endlessly manipulating a Four-in-Hand into a shape it does not naturally produce.
The Knot Is Too Bulky
Consider three things:
Tie thickness: Heavy fabric creates more volume.
Knot choice: A Full Windsor requires more wrapping than a Four-in-Hand.
Collar spread: A knot that looks proportionate under a wide-spread collar may overwhelm a narrow point collar.
Switching to a smaller knot is often the easiest solution.
The Front Loop Becomes Too Tight
This usually happens because you pull the horizontal band tight before feeding the wide end through it.
When creating the final front wrap, keep one finger behind the band.
After the wide end passes through, remove your finger and tighten the knot gradually.
The Narrow End Sticks Out
Make sure it sits directly behind the wide blade.
Use the keeper loop on the back of the tie if available.
If the narrow end extends below the wide end, retie with adjusted starting lengths.
The Knot Has Wrinkles
Do not crush the knot while forming it.
Guide the fabric instead of pulling every movement as tight as possible. Final tightening should happen progressively while you shape the knot.
How to Tie a Tie in a Mirror
Using a mirror helps with positioning, but it can also make directions confusing because the reflection reverses what you see.
A better approach is to remember the sequence of movements rather than relying completely on “left” and “right.”
For the Four-in-Hand, remember:
over → behind → front → neck loop → front loop → tighten
Your hands can follow those movements even when the mirror makes the directions feel reversed.
Some illustrated tie guides explicitly present their instructions as mirrored because the viewer is expected to follow them while facing a reflection.
What About Left-Handed People?
You can reverse the setup and movements if that feels more natural.
Place the wide blade on the left instead of the right and mirror the directions.
The construction of the knot does not change.
Which Shirt Collar Works With Each Tie Knot?
Collar shape matters because the space between the collar points frames the knot.
Narrow or Point Collar
A Four-in-Hand usually works well because its slim profile fits comfortably between relatively close collar points.
A Half-Windsor can also work depending on the exact collar.
Button-Down Collar
The Four-in-Hand is a natural match.
Its understated size complements the less expansive collar opening.
Semi-Spread Collar
This is highly versatile.
Try a Four-in-Hand for a narrower appearance or a Half-Windsor when you want greater symmetry and more visual weight.
Spread or Wide-Spread Collar
A Half-Windsor or Full Windsor can better fill the increased space between the collar points.
Menswear guides commonly associate the Four-in-Hand with narrower collars, the Half-Windsor with medium or semi-spread collars, and the Full Windsor with wider spreads.
These are proportional guidelines rather than rigid rules. Tie thickness, tie width, and your own proportions matter too.
Does Tie Width Affect the Knot?
Yes.
A skinny tie naturally creates less volume than a broad traditional tie. Fabric also makes a difference: a thick woven tie can produce a substantial knot even when tied with a relatively compact method.
Before choosing your knot, consider the combination of:
- Tie width
- Fabric thickness
- Collar spread
- Available tie length
- Desired level of symmetry
If your first attempt looks disproportionately large, changing the knot may work better than repeatedly reshaping it.
A Four-in-Hand generally keeps thick or slim ties manageable because it uses relatively little wrapping.
What Tie Knot Is Best for a Wedding?
There is no mandatory wedding knot.
For many wedding outfits, the Half-Windsor provides a neat balance of symmetry and moderate size. A Full Windsor can suit a wider-spread collar, while a Four-in-Hand works well when the collar and tie call for a slimmer profile.
The same principle applies to job interviews, graduations, business meetings, funerals, and other occasions where a necktie is worn.
Fit and proportion matter more than memorizing an “official” knot for every event.
If you only know the Four-in-Hand and it works with your shirt, there is no need to learn a complicated knot five minutes before leaving for the ceremony.
What Is the Easiest Way to Tie a Tie?
For most beginners, the answer is the Four-in-Hand.
Its advantage is not merely that it has relatively few steps. The sequence is repetitive enough to remember:
- Cross over.
- Wrap behind.
- Cross the front.
- Go up through the neck opening.
- Go down through the front loop.
- Tighten.
Ties.com describes it as simple, versatile, tapered, mildly asymmetrical, and self-releasing, while other current guides likewise position it as the basic knot for first-time tie wearers.
Practice that sequence several times rather than trying a different knot after every unsuccessful attempt.
Muscle memory develops surprisingly quickly.
How Do You Untie a Tie Properly?
Do not repeatedly yank the narrow end through the finished knot.
Instead, reverse the tying process.
Loosen the knot, pull the wide blade back through the final front loop, and continue reversing the wraps until the tie is completely free.
This is gentler on the fabric and helps prevent persistent creases.
After removing it, hang the tie or store it appropriately rather than leaving it tightly knotted overnight.
If wrinkles remain after wear, giving the fabric time to relax is often better than immediately forcing it flat.
How to Practice Until You Can Tie a Tie Without Thinking
You do not need hours of practice.
The most effective approach is to repeat the same knot several times in one session.
Use the Four-in-Hand.
Tie it slowly while watching your hands. Untie it completely. Then repeat the same sequence.
On each attempt, focus on one improvement:
- Correct starting length
- Cleaner front wrap
- Easier passage through the front loop
- Better knot shape
- Proper finished length
- A centered dimple
After a few repetitions, stop reading the instructions and try from memory.
If you forget what comes next, remember the short sequence:
over, behind, front, up, down, tighten.
Once that feels automatic, move to the Half-Windsor.
Learning one knot thoroughly is far more useful than vaguely remembering five.
Final Check Before You Leave
After you have tied your necktie, spend a few seconds checking the finished result.
The knot should sit comfortably against the collar. The wide blade should cover the narrow blade and finish around the waistband or belt area. The narrow end should remain behind it, and the collar should sit smoothly around the knot.
Then look at the knot itself.
A Four-in-Hand can be slightly asymmetrical. A Half-Windsor or Full Windsor should appear more balanced. A small central dimple can add definition, but the overall fit and proportion matter more than achieving a perfectly sculpted shape.
Learning how to tie a tie becomes much easier once you stop treating it as a long series of unrelated instructions. Start with the Four-in-Hand and remember one simple pattern: over, behind, across, up, through, tighten.
Master that first. Once your hands know the movement, the Half-Windsor and Full Windsor become straightforward additions rather than completely new skills.